User Management
Overview
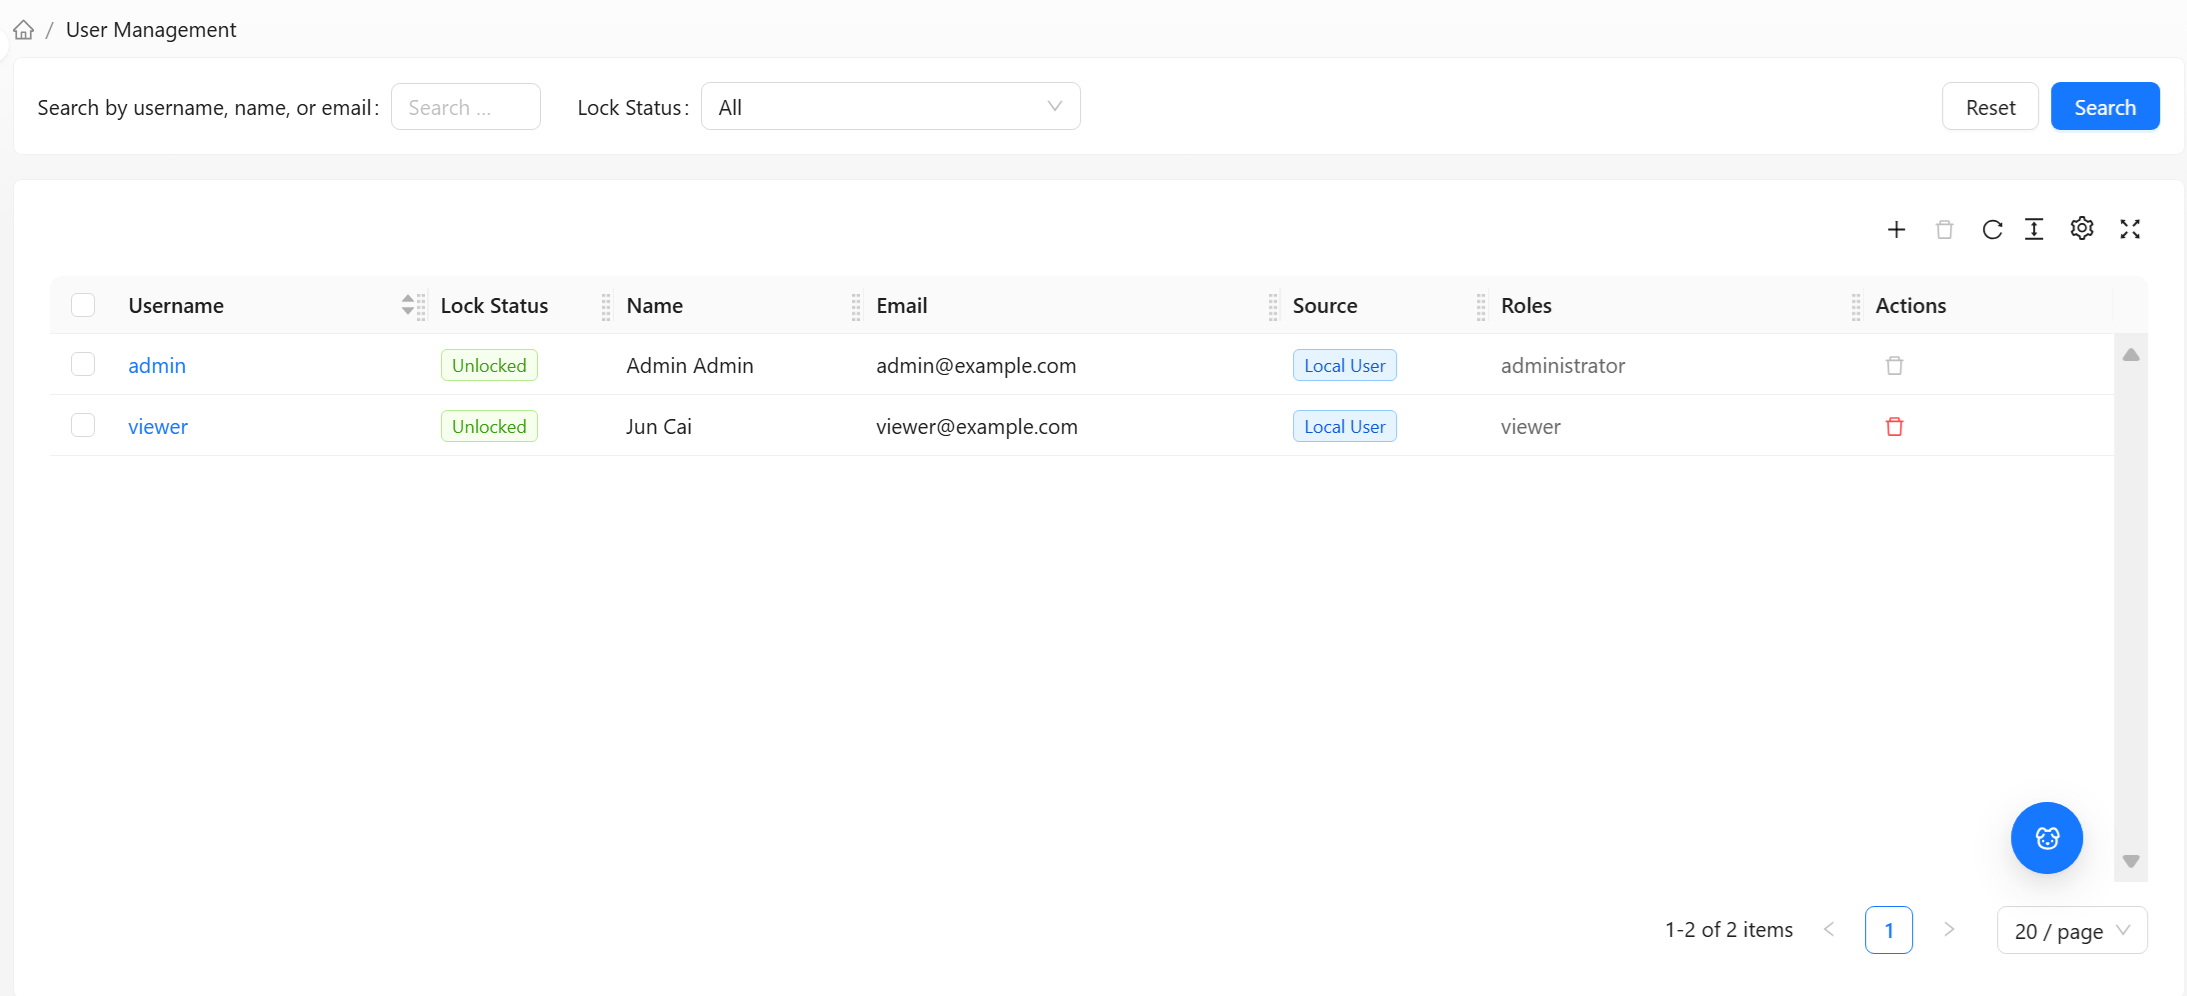
User Management is used to manage login accounts in the system. Here you can create new users, view the user list, search for users, enter user details to adjust information, or reset passwords.
Key Features
- Full account lifecycle management: Create, edit, disable, and delete users
- Multiple activation methods: Activate new accounts via temporary password or email invitation (business tenant)
- Quick search: Fuzzy search by username, name, or email, and filter by locked status
- Bulk operations: Select multiple users for batch deletion
- Security controls: Identify locked accounts and prevent deletion of the initial administrator account
Interface Layout
The User Management page uses a standard list layout, divided into three sections: search/filter area, table area, and toolbar.
Search and Filter Area
The search bar above the table provides the following search criteria:
| Criterion | Description |
|---|---|
| Search box | Fuzzy search by username, name, or email, case-insensitive |
| Lock status | Filter by "All / Locked / Unlocked" accounts |
Enter criteria and click Search to execute the query, or click Reset to clear all criteria.
User List
For common table operations such as column management, density, pagination, and quick navigation, see Data Table Common Operations.
The user list displays the following columns by default:
| Column | Description |
|---|---|
| Username | Login identifier; click to enter user details |
| Name | User's first and last name |
| Contact email | |
| Source | Local user (created in the system) or external user (synced from an external identity source) |
| Lock status | Locked (red tag) or unlocked (green tag) |
| Roles | Roles directly assigned to the user (only shown in business tenant, up to 2 displayed) |
| Actions | Per-row delete (requires edit permission) |
Common reasons an account may be locked: an administrator manually locks it, or the system's brute-force protection is triggered after multiple consecutive failed password attempts. Locked users cannot log in; an administrator needs to reset the password or unlock the account. See User Details - Lock Status.
Toolbar
The toolbar in the upper-right corner of the table provides the following actions:
| Button | Function | Use Case |
|---|---|---|
| Create | Opens the "Create User" dialog | Adding a new login account |
| Batch Delete | Deletes multiple selected users at once | Bulk cleanup of expired accounts |
| Refresh | Reloads the user list | Data was changed elsewhere and you want to see the latest results |
The above create and delete operations are only visible to administrators with "full access" permission on the "User" resource. Regular users can only view.
Creating a User
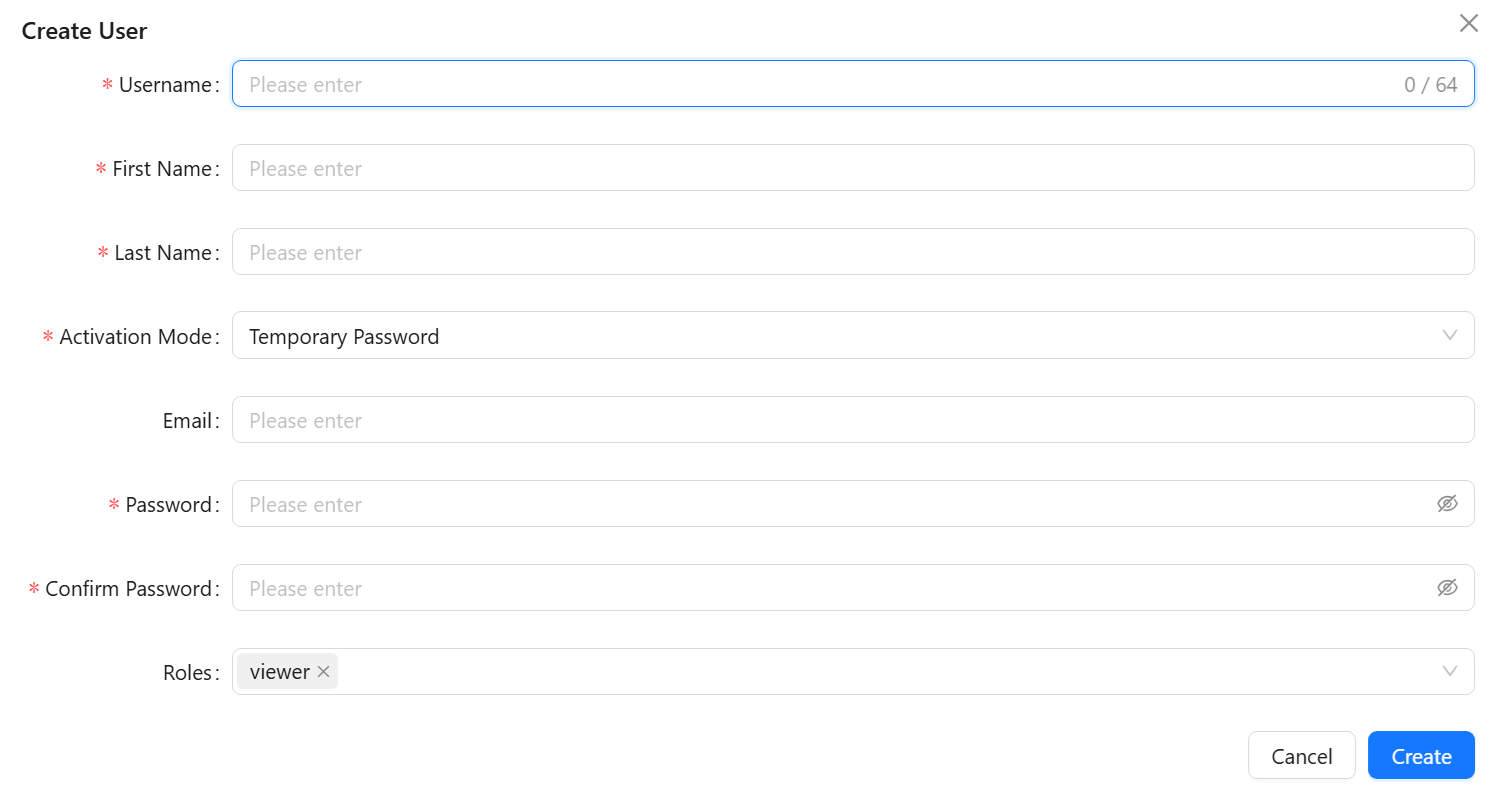
Click the Create button in the toolbar to open the Create User dialog.
Field Descriptions
| Field | Required | Description |
|---|---|---|
| Username | Yes | Login identifier; cannot be changed after creation. 3-64 characters, must start with a letter, and may only contain letters, numbers, underscores (_), and hyphens (-) |
| First name | Yes | User's first name |
| Last name | Yes | User's last name |
| Activation method | Yes | See "Activation Methods" below (only shown in business tenant) |
| Required for email activation | Contact email. Must be filled in when "Email Activation" is selected | |
| Password | Required for temporary password | At least 8 characters; must include uppercase letters, lowercase letters, numbers, and special characters |
| Confirm password | Required for temporary password | Must match the password |
| Roles | No | Roles directly assigned to the user; "Read-Only User" is checked by default. Can also be assigned later in User Details or User Groups (only shown in business tenant) |
Activation Methods
When creating a user in a business tenant, you can choose from two activation methods:
| Activation Method | Process | Suitable For |
|---|---|---|
| Temporary password (default) | You set a password for the new user, communicate it to the user, and the user must change it on first login | When you know the person and can securely deliver the password |
| Email activation | The system sends an activation email to the user's mailbox; the user sets their own password | When a valid email is available and you want the user to self-set their password |
If the user's email is correct but the email delivery fails (e.g., mailbox is unreachable or email service is down), the system will display "User created, but activation email failed to send." In this case, the user account has been created but no activation email was received. Please verify the email address or email service and resend.
In the system tenant, the Create User dialog only has basic fields such as username, first name, last name, password, and confirm password. There is no "Activation Method" or "Roles" option. Users in the system tenant are always activated using the temporary password method.
Creation Steps
- Click the Create button in the toolbar
- Fill in the username, last name, and first name
- Select an activation method (business tenant):
- Temporary password: fill in and confirm the password
- Email activation: fill in a valid email address
- Optionally check roles to assign (business tenant; "Read-Only User" is checked by default)
- Click Create to submit
A confirmation message will appear upon successful creation, and the new user will immediately appear in the list.
Deleting Users
Deleting a Single User
Click the delete icon in the Actions column of the corresponding row, then click Confirm in the confirmation dialog.
Batch Deletion
- Select multiple users to delete in the table (checkbox in the first column)
- Click the Batch Delete button in the toolbar
- Confirm the number of deletions in the confirmation dialog, then click Confirm
Deletion Restrictions
The system provides protection for the following scenarios:
| Scenario | Result |
|---|---|
| Attempting to delete the initial administrator account | The delete button for that account is grayed out and cannot be selected; displays "Initial user cannot be deleted" |
| Batch deletion that includes the initial account | The initial account is automatically excluded; the rest are deleted normally with a notification |
Deleting a user does not delete the configuration items, dashboards, or other business data they created. The "creator" and "last updated by" records for that data are preserved; only the account can no longer log in to the system.
Entering User Details
Click the Username link in the list to enter that user's details page, where you can edit basic information, assign roles and user groups, reset passwords, and more. See User Details.