Collection Point Details
Overview
Click a collection point name in the Collection Point List to enter its details page. This page centrally displays and configures all information for a single collection point: basic connection parameters, tags, macros, and various discovery rules. It is the primary interface for adjusting "how exactly this device gets collected" in day-to-day operations.
The details page uses a top sections + tabs hybrid layout: the top sections contain the collection point's own attributes, and the tabs below contain its mounted discovery rules.
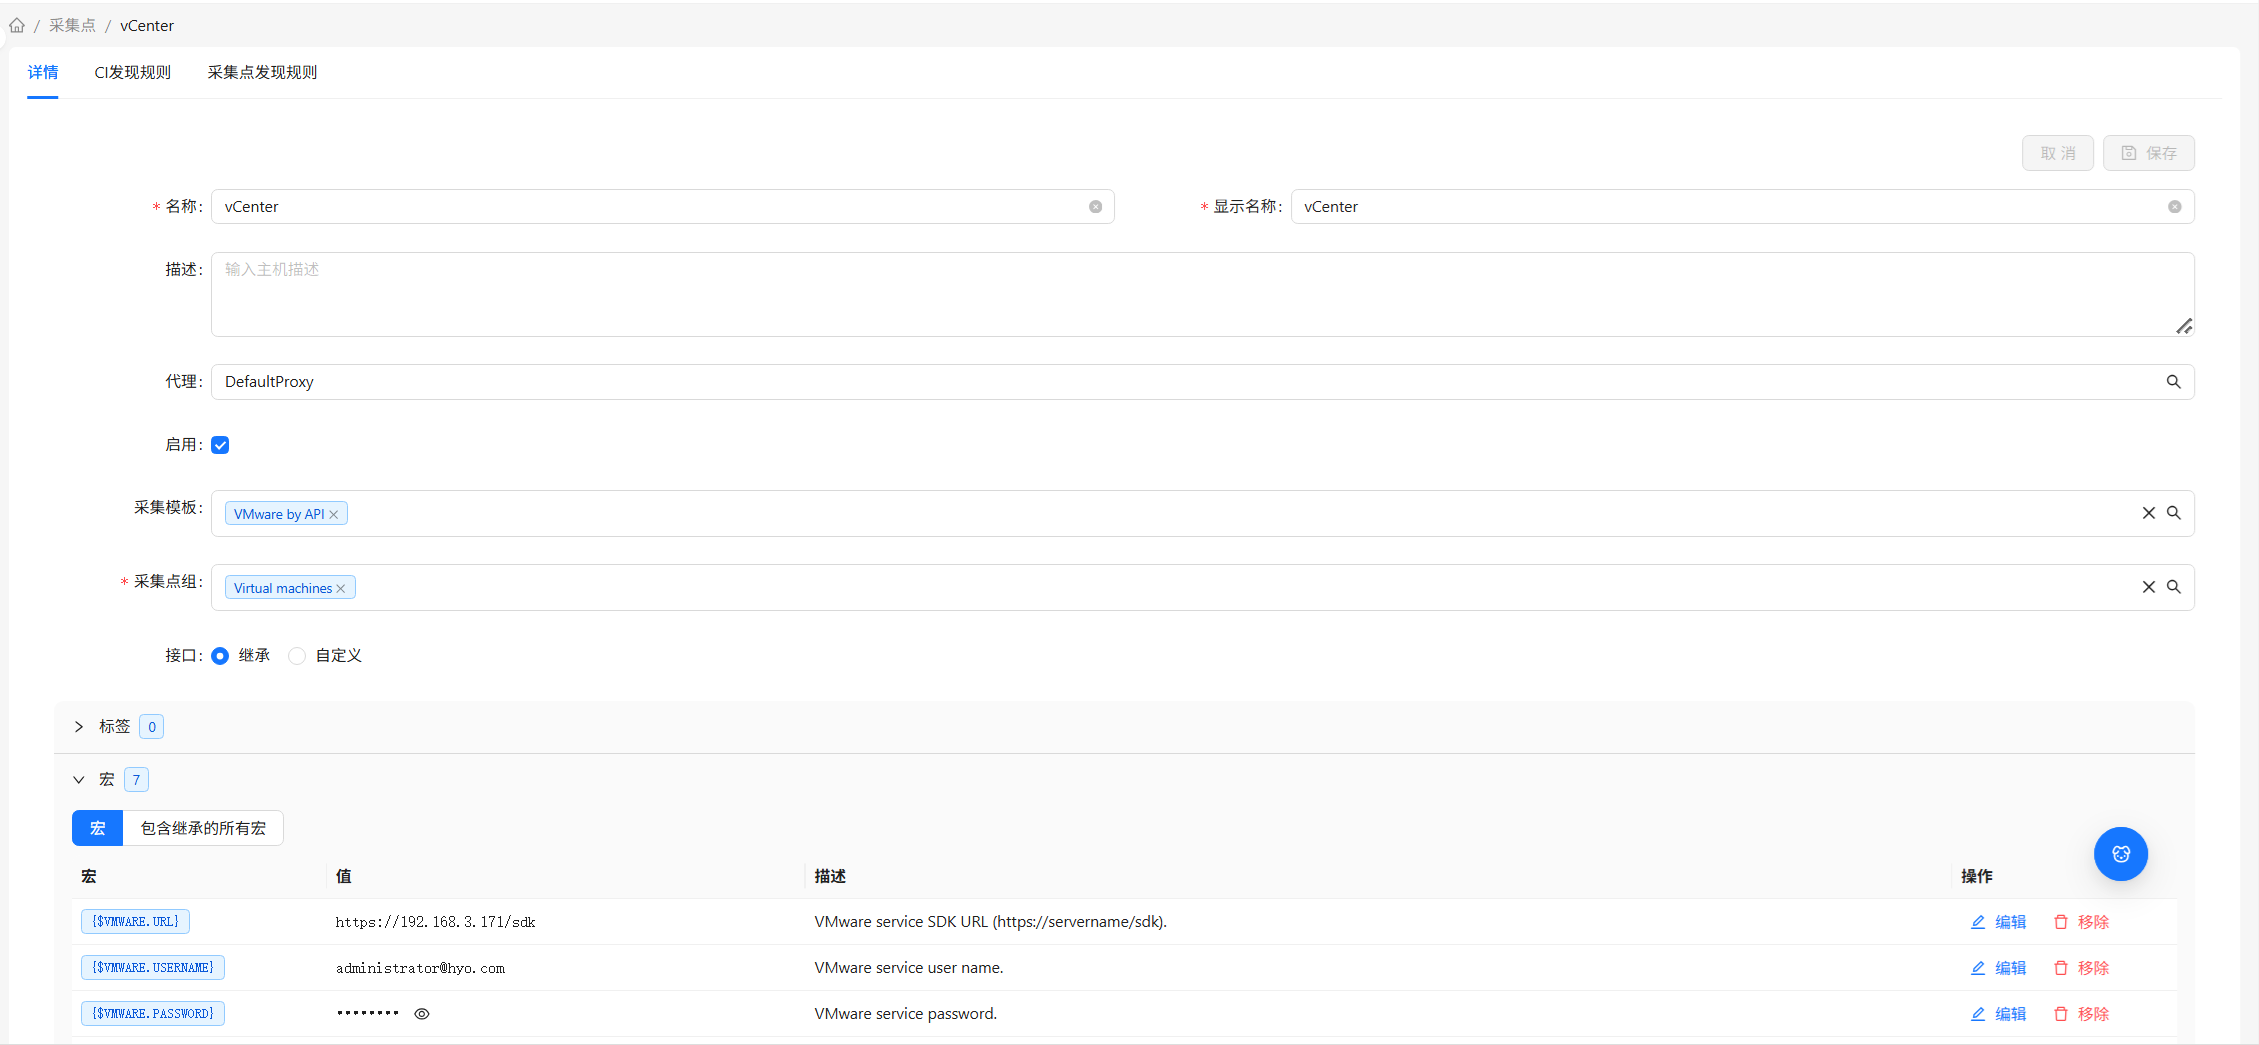
Page Layout
| Area | Content |
|---|---|
| Top: Overview | The collection point's basic connection info (name, interface, agent, associated template, group, status, etc.) |
| Top: Tags | Key-value pair tags used for grouping and filtering |
| Top: Macros | Variable definitions used for parameterization within templates |
| Tab: CI Discovery Rules | Rules that map collection data to Configuration Items (CIs) |
| Tab: Collection Point Discovery Rules | Discovery rules that dynamically generate collection points based on collection point data |
Top Sections
Overview
This is the core connection configuration for the collection point, determining "how the system establishes a collection channel with this device":
| Setting | Description |
|---|---|
| Name | The collection point's display name |
| Interface | The entry point for connecting to the device — address (IP / DNS), port, connection protocol (e.g., Agent, SNMP). A collection point can have multiple interfaces, one of which is the primary |
| Agent | Which agent is responsible for collection; if unspecified, the platform connects directly |
| Associated Template | The applied Collection Template. Discovery rules and other configurations from the template sync to this collection point |
| Group | The collection group it belongs to, used for bulk management |
| Status | Enabled / Disabled |
The "Interface" is the most common source of problems. If a collection point shows as enabled but unreachable in the list, come back here and check: is the address correct, is the port correct, and does the connection protocol match the service actually running on the device.
Tags
Tags are key-value pairs attached to the collection point (e.g., env: prod, role: web). They don't participate in collection logic but are very useful for:
- Filtering a group of devices by tag in the list
- Tagging by Collection Rules during auto-onboarding
- Serving as filter conditions for bulk operations
A collection point can have multiple tags.
Macros
Macros are collection point-level variables in the format {$MACRO} (uppercase name wrapped in {$ }). Their purpose is to let the same Collection Template present different values on different collection points — you write variables in the template and fill in the actual values in each collection point's "Macros" section.
For example, if a collection rule in a template uses a timeout variable {$TIMEOUT}, then the web server collection point can set {$TIMEOUT} to 3, while an older device's collection point sets it to 10 — both share the same template but adapt individually.
When both the template and the collection point define the same macro, the collection point's value wins. This lets you enjoy the unified configuration of templates while overriding special values on individual devices.
Tabs: Discovery Rules
Discovery rules are "collection strategy extensions" for a collection point, used to automatically derive additional collection items. The details page provides two types of discovery rule tabs:
CI Discovery Rules
Rules that map collected data to Configuration Items (CIs). Each rule defines "which data key to extract values from, what type, at what update interval, and ultimately which CIs are created in the CMDB." The list displays:
| Column | Description |
|---|---|
| Name | Rule name |
| Key | The data key to extract from (e.g., ssh.ci.discovery, snmp.ci.discovery) |
| Type | Data collection type |
| Update Interval | How often to update |
| Status | Enabled / Disabled |
Typical use case: automatically organizing raw data reported by a collection point — such as hostname, IP, serial number, network interfaces, disks, installed software — into managed Configuration Items in the CMDB.
Editing a CI Discovery Rule
Click a rule to enter editing. The following can be configured:
| Setting | Description |
|---|---|
| Name / Type / Key | Rule identification. The Key determines what data this rule collects and which CI type it ultimately produces (see below). You cannot individually select CI categories in the form |
| Collection Interface | Which interface of the collection point to use for data extraction |
| Update Interval / Timeout | How often to run and the single-run timeout threshold |
| Keep Lost Resource Period | How long CIs that have disappeared from the device are retained in the CMDB before cleanup |
| Enabled | Whether it takes effect |
The key determines which CIs are produced. For example, ssh.ci.discovery produces Linux / macOS host CIs along with their network cards, IPs, disks, installed software, applications, etc.; vmware.ci.discovery produces vCenter, cluster, ESXi, virtual machine, and other topology CIs. Change the key, and the CI categories produced will be different — CI categories are determined by the key and backend mapping, and cannot and do not need to be individually selected in the form.
Discovery Options: Whether to also collect software / applications
For SSH / WMI / WinRM CI discovery keys, a Discovery Options multi-select appears in the form (e.g., "SSH Discovery Options"), providing two switches that are checked by default:
| Option | Effect |
|---|---|
| Collect Installed Software | Additionally collects the list of software installed on the device, producing "Installed Software" CIs |
| Collect Applications | Additionally collects running applications / processes, producing "Application" CIs |
Both are enabled by default. If you only want lightweight discovery and don't want to pull large software / application inventories (which can significantly increase collection volume and CMDB noise in large environments), uncheck them here.
CI Filtering: Exclude unwanted CIs
CI Filtering is used to conditionally exclude certain discovered CIs, preventing low-value CIs from being pushed into the CMDB. Filters are organized by groups, each targeting one CI type (CIT, e.g., ci_linux_redhat):
- Each group first specifies a CI Type, then provides a set of conditions (attribute + operator + value).
- Multiple conditions within a group can be combined using AND (all must match) or OR (any must match).
- The semantics are "match means exclude": if a discovered CI's type matches a group's CIT and that group's conditions are met, the CI is discarded and not written to the CMDB.
- No filter configured = no filtering; all discovered CIs enter the CMDB.
Supported operators:
| Operator | Meaning |
|---|---|
| Contains / Does Not Contain | Whether the attribute value contains the specified text (case-insensitive) |
| Equals / Does Not Equal | Whether the attribute value equals the specified text |
| Matches Regex / Does Not Match Regex | Whether the attribute value matches a regular expression |
| Is Not Empty / Is Empty | Whether the attribute has a value (no value input needed) |
The CI Filter in CI Discovery Rules (this section) targets "which CIs are not written to the CMDB" with exclusion semantics, grouped by CI type. The filters in Collection Point Discovery Rules below are a separate mechanism targeting "which discovered items should generate collection points." The two look similar but operate on different objects — don't conflate them.
If a certain CI type never appears in the CMDB, in addition to checking whether the collection point is reachable and credentials have sufficient permissions, also check the CI Filter on this CI Discovery Rule — it may have been incorrectly excluded by an overly broad condition (e.g., a regex typo or a group condition that is too loose for that CIT). Temporarily clearing the filter is a quick way to verify.
Collection Point Discovery Rules
Collection Point Discovery Rules: Based on dynamic data returned by a collection point (e.g., all ports on a switch), automatically generate a collection point for each discovered element. The list displays:
| Column | Description |
|---|---|
| Name | Rule name |
| Key | The data key for discovery data |
| Type | Collection type |
| Status | Enabled / Disabled |
| Description | Rule description |
Typical use case: a switch has 48 ports — creating collection points one by one is impractical. A single discovery rule can "auto-generate a collection point for each port discovered."
Simply put: CI Discovery Rules are responsible for "turning data into CIs (pushing into the CMDB)"; Collection Point Discovery Rules are responsible for "generating collection points as needed (expanding the collection surface)." One serves the asset registry; the other serves collection point onboarding.
Top Bar Actions
The following actions are available at the top of the details page for the current collection point:
| Action | Description |
|---|---|
| Enable / Disable | Toggle collection status. Disable = pause collection (configuration is preserved) |
| Delete | Delete this collection point |
| Refresh | Reload details data |
Creating a Collection Point
When manually creating a collection point (most collection points are auto-created by Collection Rules; manual creation is typically for a small number of special devices), fill in the following in order:
| Section | What to Fill |
|---|---|
| Overview | Name, interface (address/port/protocol), agent, associated template, group, status |
| Tags | (Optional) Key-value pair tags |
| Macros | (Optional) Variable definitions |
Click Save to complete creation. The most critical part is getting the Interface right — it is the prerequisite for the system being able to connect to the device.
Common Scenarios
Scenario 1: Adjusting the collection timeout for a specific device
An older device keeps timing out during collection: go to its details page → Macros section → add {$TIMEOUT} and set a larger value → Save. The timeout logic in the associated template will use this value instead.
Scenario 2: Tagging a batch of devices with an environment label for easy filtering
While tagging one by one is slow (bulk tagging is best done automatically via Collection Rules), for a small number of devices: go to the details page → Tags → add env: prod → Save. Afterwards, filter by tag in the Collection Point List.
Scenario 3: Pausing collection for a device without deleting its configuration
A device is temporarily taken offline for maintenance and you don't want it constantly reporting as unreachable: click Disable at the top of the details page. After maintenance, click Enable to resume — all configuration is preserved as-is.